Learn How to Draw: Basic Drawing for Beginners

- Description
- Curriculum
- FAQ
- Reviews
Learn the drawing fundamentals every artist should know- How to draw for beginner and intermediate artists and illustrators.
What we’ll cover in class:
- How to draw simple shapes (circles, triangles, squares, etc.)
- Breaking your subject down into shapes
- How to simplify complex curves into angles
- How to draw by looking at negative space
- Techniques for drawing
- Drawing upside down trick
- Using horizontal and vertical lines to check proportions
- How to draw forms (spheres, cubes, and cylinders)
- Breaking your subject down into forms
- Values and creating a value scale
- How to shade realistically
- How to draw with rhythms/ How to draw lyrically
- Experimenting with your drawing materials and brushes
- Ideas on how you can practice drawing
- Drawing from life example
- Drawing from a photo example
- Drawing from the masters like John Singer Sargent and Andrew Loomis
- How to make quick gesture drawings
- Ideas for drawing from your imagination
- Tips for beginner artists
Go back to the basics and learn how to draw anything with drawing techniques
About this class:
In this course, I’ll walk you through the basic fundamentals of drawing to help you build your drawing skills!
You will learn how to see your subjects as basic shapes, how to confidently place your subject on your paper with simple angles, and how to draw by observing the negative space.
I will share measuring techniques that will help you draw more accurately, exercises that will help you activate your creative right brain, and I’ll share how you can find rhythms in your subjects to create beautiful, lyrical compositions.
We’ll also go over five project ideas to help you practice the concepts taught in class. I’ll share examples of how I approach drawing from life, photos, the masters, and more. You’ll see how I apply drawing fundamentals throughout each demonstration.
This class shows examples in both traditional media (pencil and paper) and digital media (the Procreate app and iPad Pro with Apple Pencil.)
Why learn with me:
I’ve been drawing for over 20 years and I still love it as much as I did on day one! I have a passion for art, but I also have a passion for teaching art.
I’ve had the pleasure of working with many companies, including Procreate, Clip Studio Paint, XP-Pen, Huion, Ohuhu Markers, and more.
I’ve taught thousands of students how to improve their drawings and illustrations and I’d love to help you on your art journey too. Let me share with you the essential drawing techniques that have taken me years of study to figure out.
If you’ve always wanted to learn how to draw, but didn’t know where to begin, join in today to learn new ways of seeing (and drawing) the world around you.
What if I am an absolute beginner?
We’ll start with the very basics- simple shapes! Think back to kindergarten. You’ll get warmed up by drawing circles, squares, and triangles, over and over again. So don’t feel intimidated if you’re a beginner because we will start small and work from there.
I do share iPad/Procreate examples in class, but you can still apply many of the techniques with pencil and paper. In all cases, there is a traditional pencil and paper work around! I share many pencil examples too if those are the materials you have on hand though. All of these lessons are meant to be built upon. And over time, with practice and learning, you’ll get better and better. So don’t feel discouraged if you’re a beginner. This is a good class to start with to help you begin to see the world around you differently, through an artist’s lens.
What materials will I need for class?
Here are my recommended materials. Although, you can use whatever drawing medium you wish.
Drawing Materials:
- 0.3 3H Lead & 0.3 Draft-Line Pencil
- 0.5 4B Lead & 0.5 Staedtler Pencil
- Other Pencil Options: Pro-Matic MC5 or 2B Pentel Lead & 0.9 Draft-Line Pencil
- Smooth white paper is great, I like HP Premium Choice LaserJet Paper
- Kneaded Eraser
- Sakura Electric Eraser
- White Gel Pen
- Blending Stumps (I like the brand Art Alternatives)
Digital Tools:
- iPad Pro, Apple Pencil, Procreate (You can download Procreate in the App Store on your iPad)
How will this course help me in my life, personally and professionally?
Learning how to draw is a lifelong wish of many, like learning how to play the guitar, or learning how to bake a cake from scratch. As humans, we have a longing to create. So if you have ever found you have that longing to learn how to draw, it just may mean you have a passion for it. This passion will be your fuel to continue when learning has its inevitable bumps in the road. Learning to draw can bring creative fulfillment into your life that you’ve been seeking and it is a wonderful and rewarding skill that has numerous benefits.
Drawing is a great way to express yourself. Knowing how to draw allows you to create images and illustrations that convey your thoughts and emotions in a unique way. This can be especially beneficial in fields such as graphic design, advertising, and animation, where visual communication is a necessary skill to have.
Drawing can also be a relaxing and meditative activity that can help reduce stress and anxiety and bring creative fulfillment to your life. It allows you to focus your mind on a single task and immerse yourself into the process of creating something beautiful. Art can be therapeutic, helping you forget the stresses of the day.
If you want to be a professional artist one day, you have to start with the basics. This course will walk you through the very basic fundamental techniques every artist should have in their tool belt.
Learning how to draw can positively effect your life in many ways. Whether you are interested in pursuing art professionally, or if you simply want to flex your creative muscles, there is no better time to start learning than today.
How is this course taught?
This course is taught in the English language through top down view tutorials. I’ve also included screen recordings for when I am drawing on the iPad Pro using the Procreate App.
I typically teach by first sharing the overall idea/concept. After that, I’ll demonstrate the ideas through an example or tutorial. And then finally, I’ll share how you can put the ideas into action through practice. Often I will share resources and worksheets to help you solidify the information taught.
I’d love to help you on your journey of learning to draw.
-
2
 Drawing Shapes
Let's start with the very basics- shapes! Get warmed up by drawing circles, squares, and triangles, over and over again. You may find you have several pieces of paper filled with shapes by the end of this lesson. Consider this a warm up for drawing.
With time, you'll develop a muscle memory for drawing these shapes. So if you're a beginner, draw each shape at least 50 times. Then you should be feeling more confident in your abilities.
-
3
Breaking Things Down into Shapes
Watch as I break this *ape* down into simplified, geometric shapes. Here I use ovals and many trapezoids to simplify him.
But there is no right or wrong way to simplify with shapes. One artist will see shapes differently than another! Lean into your instincts when picking shapes to represent areas of your subject. Does the area you're drawing most look like a circle, a square, an oval? Draw it as such!
The photo of the ape was purchased with a standard license, so I can not share it in class. But I do have 3 worksheets with other animals so you can try your hand at breaking things down into shapes!
-
4
Seeing Angles
It's easy to get overwhelmed with the intricacies of any given subject, but drawing with simplified angles will give you a clear silhouette.
In this video, you'll see how I simplify curves and indents into straight angles to help get my subject placed on the paper.
-
5
Drawing the Negative Space
This technique is one of my very favorites. It is an essential technique that I use in every drawing that I make.
Drawing the negative space helps us draw without preconceived or programmed ideas. Therefore, if we can draw negative space, then we can draw more accurately.
Learning to see the negative space, or negative shapes, is a technique that may take some practice. So if you can't get it quite yet, keep an observant eye! With time and practice, your brain will learn to spot the negative space all around you.
-
6
Drawing Upside Down
This is another exercise that will help you rely less on symbols and more on what's really in front of you. It's no longer a specific object you're drawing, but a bunch of random shapes.
Again, you see what's actually there because your brain doesn't have any preconceived ideas for it. You can look at it more objectively.
This exercise can also help you become better at spotting proportional distances between things. If you struggled at all with seeing negative space in the last lesson, this will be another great practice for that. Try using this lesson in combination with observing negative space.
-
7
Measuring Techniques
In this lesson, we'll go over some easy measuring methods you can use in your drawings.
When I start a drawing, I like to start with shapes, angles, and drawing the negative space. But once I have something up on the canvas to work with, I find it's good to go in and check my work with measuring.
Watch as I show you how you can apply measuring techniques with digital tools. And then near the end of this video, I'll show you how you can apply these ideas using traditional tools like pencil and paper.
-
8
Drawing Forms
Forms are 3D geometric solids. Unlike shapes, which only communicate length and width, forms convey a third dimension of depth. Think spheres, cubes, cylinders, cones, etc. Instead of working with shapes like circles, squares, and triangles, the next step, if you want to create a more 3D drawing, is to work with forms. You can convey form with light and shade as well as wrapping lines.
-
9
Breaking Things Down into Forms
In this video, I demonstrate how I would break down more complex subjects into forms.
-
10
Value Scale
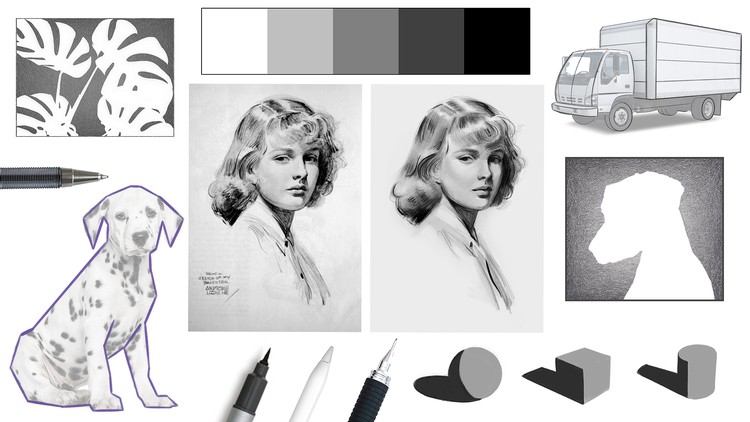
Values are essential to record correctly so that you can accurately convey lighting in a drawing and also show the 3D quality of a subject. i.e. Values, and the rendering of those values, will give you realism.
-
11
Shading Forms
In this video, I demonstrate and offer tips on how I draw values on basic forms to create 3D believability. Then we break down the different values, talking about the light, halftones, shadows, form shadows, cast shadows, occlusion shadows, reflected light, & core shadow.
If you want to make pieces that communicate a sense of light, then a good first step would be to practice drawing simple forms. Shading with values will give the appearance of light and will add a further sense of depth and realism to your pieces.
-
12
Drawing Rhythmically
In this lecture, we discuss how encouraging rhythm in a piece will help your viewers eyes flow around your artwork, making it pleasing to look at.
-
13
Experimenting with Materials
In this video, I demonstrate and explain the importance of exploring different ways of mark-making, experimenting with blending materials, and discovering how you make a variety of textures with different drawing mediums.
-
14
Projects Overview
Project ideas to help you hone your skills:
Draw from a photo
Draw from life
Copy an art piece by a master
Create quick gesture drawings
Draw from your memory
As you work on your drawing project(s), you'll want to remember that you won't just use one idea on its own but instead, use a combination of many techniques. Use angles, forms, rhythms, and everything else taught in the previous lectures to bring the entire piece together.
-
15
Example 1: Drawing from Photos
Drawing the human head is said to be one of the most difficult things to draw! So don't expect to be able to draw a portrait right away. But I hope with this demonstration, I can show you what is possible, through practicing the ideas taught in this class and with time and dedicated effort!
Find free reference photos in the External Resources linked to in this lecture.
-
16
Example 2: Drawing from Life
When drawing from life- colors, shapes, edges, everything, is going straight from your subject and right into your eyes with no camera translating the information in between. And there is real value in that!
In this lecture, I share tips on how I approach drawing from life.
-
17
Example 3: Copying the Masters
This is one of the exercises that I think has consistently pushed me forward in my art. I think probably for every 5 portraits I made on my own, 1 master copy was as beneficial in developing and upping my skills!
Do not sleep on making studies of the masters. (Or whoever you personally consider to be a master!)
-
18
Example 4: Quick Sketches
-
19
Example 5: Drawing from your Imagination
A wonderful way to test what you know is through imaginative sketching.
In this quick lecture, I remind you of the importance of checking in on your skills by drawing from your memory.