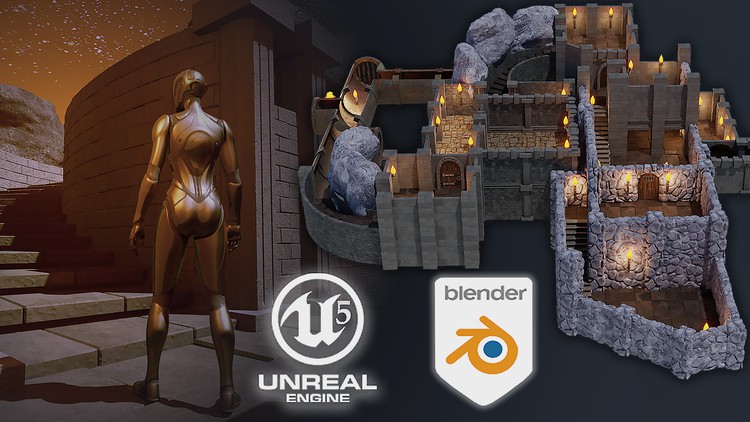
Blender 3 to Unreal Engine 5 Dungeon Modular Kitbash

- Description
- Curriculum
- FAQ
- Reviews
Course Description
Have you ever wanted to build your own dungeon and walk around it like in a real RPG game?
Join ‘Blender 3 to Unreal Engine 5 Dungeon Modular Kitbash’ because there’s nothing like it! Go on a journey of 3D modelling to game environment in Blender and Unreal Engine 5.
Whether you are a RPG fan or dungeons and dragons (DND) player who wants to walk through and experience a medieval dungeon environment, or a game designer who would like to design a medieval dungeon environment for games, this course is perfect for you!
You will become a dungeon master!
Build an intricate structure with winding walls and stairs using just a few parts and a lot of creativity.
Walk the halls of a dungeon lit by torches built entirely in Blender 3 and export it into Unreal Engine 5 (UE5) to make the lighting and atmospherics even more magical.
Our ‘Blender 3 to Unreal Engine 5 Dungeon Modular Kitbash’ top 5:
– Build a massive dungeon complete modular system in Blender
– Set up your dungeon ready for walking through with your very own character
– Create animated stylized fire and lighting
– Learn how to create opening in game door, custom collisions, and all about the Niagara fire systems
– Enjoy completing a complete guide from Blender to Unreal Engine 5 – the only one out there like it for all fantasy RPG fans
This course will give you access to just over 27 hours of 3D art.
As a 2-1 course, you have the option to complete everything in Blender or move onto Unreal Engine 5 as well and truly bring your 3D game environment to life through 68 additional lessons!
This course will see you learn all the techniques pros use and how they use them. Learning how to achieve realism through aging your 3D game environments will be a central part of this course’s learning objectives!
One of my biggest ‘happy moments’ in making games is being able to walk around and doors…
Yes, we will teach you how to OPEN DOORS.
Walk around your dungeon with the UE5 default character for the full immersive experience filled with wonder and the ominous feeling of fear about what is going on in the depths of the dungeon which we call the torture room!
Modeling
Our ‘Blender 3 to Unreal Engine 5 Dungeon Modular Kitbash’ will take you on a journey of building 90 medieval dungeon kitbash parts.
Join the craziest medieval dungeon course to create a modular system (aka kitbash) with infinite possibilities for your environment build. By completing the course, you will be able to build vast sewer networks and individual rooms on various levels including intricate chairs and doors that open using a third-person character.
You will be creating variations of walls, stairs, and sewer network parts to build a game environment unique to every student. Finally, optimize your modular system parts ready to export them into Unreal Engine 5.
Following the success of my latest courses, we will be modelling, texturing, and finalizing every individual asset before moving on to the next. Students have said that this has helped them in staying excited throughout the creation process, being able to see how their scene comes closer to the course preview step-by-step.
Of course, you could set yourself a challenge and diversify aspects of the medieval dungeon such as changing the textures, adding more rooms, or adding furniture assets to make your medieval dungeon more alive.
Texturing and Materials
‘Blender 3 to Unreal Engine 5 Dungeon Modular Kitbash’ will provide you with intensive learning all in one place, giving you access to over 16 references, 1 medieval dungeon floor plan, 32 custom cliff brushes, 1 HDRI, 55 Blender texture maps -including ambient occlusion, metalic, normal, roughness and specular, 33 Unreal Engine 5 texture maps – including base colour, normal, and combined ambient occlusion / metalic / roughness, 1 human scale .obj, 90 dungeon modular parts (in case you choose to move straight into Unreal Engine 5), and Unreal Engine 5 content such as the lava texture, water texture, waterfall animation sheet, and skybox.
The node wrangler is one of the best free built-in addons within Blender but most users are not even aware of it. This course will teach you how to create your materials, find out how to take all of those beautiful texture maps and make use of them.
Creating your materials or altering textures on the fly is something you will want to learn about. Maximising your knowledge of Blender’s node system will raise the level of your textures and skill up your skill in working with materials.
Unreal Engine 5: Game Engine Integration
Continue your modelling to game engine journey by completing the second (independent) part of the course in Unreal Engine 5. We will be taking a deep dive into Epic’s all new Unreal Engine 5.
Through ‘Blender 3 to Unreal Engine 5 Dungeon Modular Kitbash’ you will be learning everything right from importing individual models from Blender to having them work correctly in UE5. Through this course, you will learn the basics of bringing your games asset to life, rendered in real time.
Learn how to open a game door using blueprint coding, custom collisions, and all about the Niagara fire systems to create particle effects. Work towards setting up your dungeon ready for walking through with your very own third-person character in Unreal Engine 5.
Create animated stylized fire and lighting, including braziers, and flaming torches. Build a real game environment by setting up an 8k skybox and animated lava material to feature underneath your medieval dungeon.
We will look at how to import and use textures created specifically for Unreal Engine and use them to create the materials for our medieval dungeon environment. ‘Blender 3 to Unreal Engine 5 Dungeon Modular Kitbash’ will also be an introduction into how to set up files to create a clean UI. The skills you learn here are fully transferable to all your future builds.
Lighting & Rendering
When we look at renders of 3D models on social media, we can see a huge difference between models of different artists. Most of this can be normally attributed to not only the skills of the artist but part of it can be attributed to how they achieve realism in their models.
By joining ‘Blender 3 to Unreal Engine 5 Dungeon Modular Kitbash’, you will learn about specific types of in-built Blender lighting functionalities that will enhance the rainy weather atmosphere of your medieval farmstead.
We will be going through the many pitfalls and some technical details of what Blender render options to use for the specific machine you are using. I will also be introducing you to the all-new Cycles X Blender renderer and showing you how to render out your medieval dungeon in Eevee if you so choose.
Together, we will be creating a portfolio render for any multimedia site you wish to upload your completed model to.
‘Blender 3 to Unreal Engine 5 Dungeon Modular Kitbash’ is a complete guide into using Eevee and Cycles X for lighting, rendering, shadow.
Course Resources & Freebies
The ‘Blender 3 to Unreal Engine 5 Dungeon Modular Kitbash’ resource pack includes 16 references, 1 medieval dungeon floor plan, 32 custom cliff brushes, 1 HDRI, 55 Blender texture maps -including ambient occlusion, metalic, normal, roughness and specular, 33 Unreal Engine 5 texture maps – including base colour, normal, and combined ambient occlusion / metalic / roughness, 1 human scale .obj, 90 dungeon modular parts (in case you choose to move straight into Unreal Engine 5), and Unreal Engine 5 content such as the lava texture, water texture, waterfall animation sheet, and skybox.
Join this course and come be part of a 3D modelling journey of over 27 hours of learning that will see you go away with a game-ready AAA medieval game environment full of life and animation.
Check out the free introduction and I am sure you won’t be able to put this course down!
Still unsure? Then, let me tell you what’s unique about this course:
– Creating 90 stunning medieval dungeon kitbash assets enabling you to build an underground dungeon environment unique to every student
– Building a massive dungeon complete modular system (aka kitbash) in Blender
– Choosing to continue your modelling to game engine journey by completing the second (independent) part of the course in Unreal Engine 5
– Optimising modular system parts ready to export them into Unreal Engine 5
– Learn how to open a game door, custom collisions, and all about the Niagara fire systems
– Setting up your dungeon ready for walking through with your very own third-person character in Unreal Engine 5
– Creating animated stylized fire and lighting, including braziers, and flaming torches
Let’s create something history inspired and full of life this August!
To get you pumped, imagine how well this medieval dungeon environment fits in with your other 3D Tudor projects.
Be creative! Feature your medieval dungeon kitbash environment underneath a medieval castle keep with ‘Creating a Modular Kitbash in Blender’ or underneath a guard’s tower instead. Also, think about creating an environment behind or above your scene, be it a medieval farm in the far distance using ‘Blender 3 The Ultimate Medieval Scene Course’, a church or an execution gallows staging area with ‘Blender to Unreal Engine 5 | 3D Props | Medieval Gallows’. Use the full power of Blender 3 and Unreal Engine 5 (UE5) to your advantage.
You can include your medieval RPG dungeon environment as part of our ‘Creating a Modular Kitbash in Blender’ course, nearby to your medieval in or tavern based on ‘Blender 2.8 Complete Beginners Guide to 3D Modelling a Scene’, or next to your medieval well or windmill using ‘Blender 2.8 Creating your First 3D Game Model’ and ‘Blender to Unreal Engine 5’ respectively.
Until next time, happy modelling everyone!
Neil – 3D Tudor
-
2
 Lesson 1 - The Basics of Blender
In this Lesson, we are going to introduce ourselves to the basics of Blender Software. We will learn how to interact with the interface of the program and how to interact with it.
-
3
Lesson 2 - Importing Reference images
During this Lesson, we will learn how to add reference images to our project. We will learn how to Add them to our project and set them up within a 3D space.
-
4
Lesson 3 - The Importance of Seams & Sharps
In this lesson, we are going to cover the importance of seams and we will learn how to make use of them to get better results out of our 3D assets.
-
6
Lesson 5 - What is Transformation Orientation
This lesson will teach us about how an object stores transformation values within itself to preserve original mesh data and how it can create certain issues. It will also teach you to fix the issues that are caused by it and reset its values to be applied to its original asset.
-
7
Lesson 6 - Working with Blenders Asset Manager
In this lesson, we will learn how to make use of an asset manager to build our prop library. It will teach us how to make the best use of it to store all assets and keep our project tidy.
-
8
Lesson 7 - How to Create Edge Loops
During this lesson, we will learn how to make use of edge loop functionality to add more detail to our 3D mesh and create better overall edge flow for our models. It will show us how we can create them within assets and how we make use of them within a 3D modeling workflow.
-
9
Lesson 8 - Creating Variation in Meshes
We will learn how to set up our mesh in a more organic way using a node randomizer. We will learn how to get the best results out of tiles and set them up in a way that will allow us to bring the most detail out of our floor.
-
11
Lesson 10 - Creating our First Dungeon Wall
This lesson will teach us how to lay bricks for a virtual wall. Learn how to create vertical detail out of mesh to be later used within our dungeon.
-
12
Lesson 11 - How Smoothing Works in Blender
Within This lesson, we are going to learn the differences between a smooth shader and a hard shader. Learn how we can make use of it within our low to topology to hide edges and get a smoother shape.
-
13
Lesson 12 - Techniques for Creating Geometry-
During this lesson, we are going to learn how to make variations of sewer pipes by combining primitive shapes. We will learn how to make different connections to get the most optimal pipe models for our kitbash pack.
-
14
Lesson 13 - Taking UV Unwrapping to the Next Level
The lesson will teach us more advanced techniques for UV unwrapping 3D models within Blender. We will cover techniques for UVs with no warping on our curved areas for the 3D assets.
-
15
Lesson 14 - Creating our Large Wall Modular Pieces
This lesson will show us how we can set up a variation of brick assets and how we can make use of larger brick models to create our wall.
-
16
Lesson 15 - Fixing Issues with Our Large Brick Walls
This lesson will show us how to fix issues we get whilst modeling a 3D wall asset for our kitbash dungeon pack. We will set up our large brick wall in a way that would help us bring the most out of our wall variation.
-
19
Lesson 18 - Creating the Bottom Walls
We will learn how to add detail to the sides of our dungeons by creating additional parts to our kitbash pack. We will cover a way for creating bottom parts of the walls that will we will be able to make use of when building a 3D dungeon.
-
20
Lesson 19 - Creating our Small Grate
During the lesson we will be modeling great assets for our dungeon pack. We will learn how to set up a grind using a simple blender mesh editing technique.
-
21
Lesson 20 - Creating the Top Walls
This lesson will teach us how to get the most out of our modeling and set up top wall decoration. We will learn how to model a basic mesh to get nicer detail for our dungeon walls.
-
22
Lesson 21 - Starting our Dungeon Doors
In this lesson, we will learn how to model a basic shape for our dungeon doors. We will cover techniques for setting up 3D modeled planks in a shape of a door.
-
23
Lesson 22 - Working with Proportional Editing
This lesson will teach us how to make use of a reference to create a proportional decoration for our doors. We will cover ways how to make use of a simple image to get the right forms out of 3D assets.
-
24
Lesson 23 - Adding Realism to Our Models
In this lesson, we will add further detail to our 3D dungeon doors. We will learn how to add smaller detail to highlight an overall form of a door and truly make them look like they are a part of a dungeon.
-
25
Lesson 24 - Finishing our Dungeon door Meshes
In this lesson, we will finish up our dungeon door meshes and set them up properly to be used without our 3D level. We will learn how to get the final touches out of our variations of door meshes to make sure each door looks unique within our level.
-
26
Lesson 25 - Creating Hinges & Handles the Easy Way
We will learn how to create ginges and handles using Blender modeling techniques. The lesson will show us how to set up an asset to bring the most out of our doors.
-
27
Lesson 26 - Finishing our Dungeeon Doors
This lesson will show you how to set up textures to be used for the dungeon doors. We will learn how to make the best use of our UV coordinates to get the wooden door texture to look right.
-
28
Lesson 27 - Creating Ornate Pillars
During this lesson, we will learn how to set up ornamental pillars which will we will be able to make use of within the nicer parts of a dungeon. We will learn how to model ornamental detail for the pillar using Blender techniques.
-
29
Lesson 28 - Creating the Ornate Wall Supports
The lesson will teach us how to create ornate wall supports for our dungeon. We will be using blender software to model additional decorations for the dungeon kitbash pack.
-
30
Lesson 29 - Basic Sculpting Setup in Blender
In this lesson, we will learn how to make use of blender sculpting functionality to get organic rock formations. We will cover ways to model and sculpt basic forms to set up rock variations for our dungeon.
-
31
Lesson 30 - Importing Custom Brushes to Blender
During this lesson, we will learn how to get the most detail out of rock formations by making use of custom blender sculpt brushes. We will learn how to get the most detail out of our rock formation by sculpting in natural-looking detail.
-
32
Lesson 31 - Creating our First Stairs
In this blender part of the course, we will learn how to basic stair system for our dungeon pack. We will cover ways to set up a basic form for the model and use them to the right scale.
-
33
Lesson 32 - Finishing our Straight Stairs
During this blender lesson, we will learn how to add further detail to our staircase and make them look like part of the dungeon. We will cover modeling techniques to add greater depth to our stairs.
-
34
Lesson 33 - Working with Boolean Modifier
The lesson will teach us how to make use of Boolean functionality within blender to model out assets. We will learn how to make use of a modifier to quickly add detail to our meshes with a simple click.
-
35
Lesson 34 - Modeling the Modular Door Walls
We will learn how to set up walls as assets to be used with our dungeon doors. We will learn how to create meshes to fit the right shape of each door variation.
-
36
Lesson 35 - Outlining our Door Arches
During this blender lesson, we will be 3D modeling an arc for the door to get more detail out of the dungeon. We will be creating arches to outline the overall shape of a door making it more distinguishable within a dungeon scene.
-
37
Lesson 36 - Creating the Door Arches
In this lesson, we will continue our modeling part for door arches. We will be setting up a more detailed door arch by using blender modeling techniques.
-
38
Lesson 37 - Adding Materials to our Door Arches
In this blender tutorial, we will add texture to our door arches. Learn how we can add detail to the arches and set up our materials for the 3D models.
-
39
Lesson 38 - Using the Simple Deform Modifier
Learn how we can make use of a deform modifier to bend meshes and create unique shapes. This lesson will teach us how to make curved stairs for our dungeon.
-
40
Lesson 39 - Finishing the Spiral Stair Mesh
This lesson will show us how to model additional detail to our staircase mesh. We will learn how to add and set up the parts of an asset to bring the most out of our spiral staircase.
-
41
Lesson 40 - Creating the Vault Wall
In this lesson, we are going to be setting up a vault wall 3D asset. We will cover ways for how we can add a circular hole within our bricked walls to be used within our vault section.
-
42
Lesson 41 - Parenting Objects and Keeping Transform
In this lesson, we will learn how to create and set up a vault door to be used within our dungeon-level environment. We will learn how to parent objects and keep our orientations placed in a way to make the doors open easily.
-
43
Lesson 42 - Creating the Brazier Mesh
This lesson will teach us how to 3d model a brazier asset for our dungeon pack. We will learn how to create a basic shape and set it up as an asset.
-
44
Lesson 43 - Creating the Hot coals
In this Blender lesson, we will learn how to set up texture maps using emissive channels to create a glowing coal look. We will make use of the node system and set up hot coals to be used for the 3D brazier asset.
-
45
Lesson 44 - Creating the Ornate Torch
During this lesson, we are going to learn how to set up ornamental torch 3D assets to be used within our dungeon. We are going to model a prop to light our future dungeon.
-
46
Lesson 45 - Creating the Torch Handle & Holder
Through this lesson, we continue to build up our torch asset using 3D modeling techniques. This time we are going to add handles to the holder part which will be used to attach to the sides of a wall.
-
47
Lesson 46 - Finishing our Torch Models
In this Blender lesson, we are finishing up our 3D torch model. We are setting them up with emissive maps and making sure they will have a glow at their tips.
-
50
Lesson 49 - Setting up the Light Flicker Effect
In this Blender lesson we are going to set up light sources for our torches. We will bring light to our prop by setting up a light flicker effect using an animation graph.
-
51
Lesson 50 - Creating the Flame embers
This lesson will teach us how to get extra detail out of our torch assets by setting them up with flame ember effects. We will cover a method for giving fire an extra depth and making it more believable using this simple visual detail.
-
52
Lesson 51 - Finishing the Dungeon Modular Pack
In this lesson, we are going to finish up building our asset pack and set everything in a nice order to help us work with our dungeon scene. We are going to organize our entire project to speed up our future workflow.
-
53
Lesson 52 - Building the Dungeon Sewar System
During this lesson, we are going to be building a sewer system in the Blender software. We will start creating our dungeon scene with the grittiest part of a scene and get an entire sewer system built.
-
54
Lesson 53 - Creating our First Dungeon Room
In this Blender lesson we are continuing to work on our dungeon environment. We’ll start structuring our room system and setting up our layout for a 3D scene.
-
55
Lesson 54 - Starting the Library Room
During this lesson we are going to be setting up larger rooms and making sure we add enough detail to the areas. We will be working on a library section by setting up our kitbash assets.
-
56
Lesson 55 - Finishing the Dungeon First Floor
In this lesson, we are going to get the final touches for our first-floor area by getting decorations for the walls. We are going to use our asset pack and create a unique-looking dungeon room.
-
57
Lesson 56 - Starting the Dungeon Armory
In this lesson, we are going to start making a dungeon armory area. We are going to make use of our 3D kitbash pack to create an overall design for an armory-themed area.
-
58
Lesson 57 - Creating Under Flooring
In this part of the course, we are going to get more in-depth with our level design and create a multi-leveled area. We are going to make use of our asset pack and create more interesting rooms for our dungeon.
-
59
Lesson 58 - Building the Dungeon Kitchens
In this Blender part of the course, we are going to continue working on our level design and create a dungeon kitchen area for the dungeon. We’ll be setting up our assets such as walls and designing a room section within our 3D map.
-
60
Lesson 59 - Creating the Dungeon Mid level
During this 3D level design part, we are going to dive deeper into dungeon creation and set up a middle section for a map.
-
61
Lesson 60 - Creating the Dungeon Prison
In this part of our course, we are going to be setting up a dungeon prison within our level. We are going to bring out our 3D kitbash assets such as 3D stone walls to set up a different tone for the scene.
-
62
Lesson 61 - Finishing the Dungeon Main Build
In this Blender part of our course, we will be finishing the dungeon main build. We are going to set up our final assets and have a final glance at the overall design for the map.
-
65
Lesson 64 - Rendering with Eevee Renderer
In this lesson, we will be making use of Eevee rendered to render out our 3D environment. We will set up all the necessary settings to get the best results out of the renderer.
-
66
Lesson 65 - Rendering with Cycles X Render Engine
In this part of our lesson, we will make use of a blender renderer and see the differences between cycles and engine render. We will cover their strengths and where it is best to make use of them.