Creating a Modular Kitbash in Blender

- Description
- Curriculum
- FAQ
- Reviews
Course Description
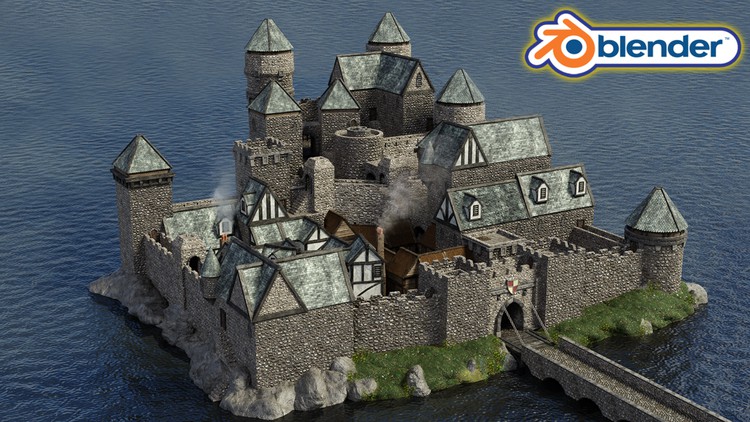
Would you like to learn how to model an entire medieval castle?
Now, what if I told you I have a course to do just that on Udemy?
‘Blender 2.9 Creating a Medieval Kitbash’ will see you creating a super varied group of interlinkable assets.
The biggest set of variations are available for roofs, castle towers, and related fixings.
There’s nothing like this course on Udemy.
‘Blender 2.9 Creating a Medieval Castle Kitbash’ will give you access to 24 full hours of 3D asset creation. It will teach you the very basics of Blender 2.9, moving on to professional techniques in a short time of accelerated learning.
And that’s not all. The course will be even longer than that because we still have to build the castle. As a result, this will certainly be my biggest course yet, scoring at over 30 hours of learning.
Through reading this course description you will find out:
– What you want to learn about 3D modeling;
– What you are going to get through ‘Blender 2.9 Creating a Medieval Kitbash’, and;
– What are you going to lose if you don’t enrol in this course.
Modeling
Join the craziest Blender course on Udemy to complete a kitbash with you infinite possibilities. By completing the course, you will be able to 3D model vast cities, towns, and castles.
We go on a journey through 65 medieval castle kitbash parts.
Through ‘Blender 2.9 Creating a Medieval Castle Kitbash’, you will be creating a series of exciting variations of castle walls, including walls with or without slits for bowmen (let’s imagine there’s an impending battle, right?!).
You will also be creating white walls like the ones we built in my ‘Blender 2.8 Complete Beginners Guide to 3D Modelling a Scene’ course. As part of building these props, you will learn how to create and apply Tudor era wall materials; the iconic wood, wattle and daub (i.e., wooden strips covered with clay).
Other awesome props will include hatch doors and windows, wooden walls, a hay roof, stone roofs, a moat bridge, and castle towers with round winding steps.
There will be a huge series of props and individual components for these towers, including extensions and decorative details.
Following the success of my latest courses, we will be modelling, texturing, and finalising every individual asset before moving onto the next. Students have said that this has helped them in staying excited throughout the creation process, being able to see how their scene comes closer to the course preview step-by-step.
Kitbash item variations will help you diversify your castle and make it unique from any other student’s. With a touch of innovative thinking, which I know you all have, you will be able to create something that stands out.
Be creative! Make your castles bigger and grander. Expand your castle keep land or beautify the upper level of the castle to make it stand out more and increase the social class divide with the other people living there.
Engage in roleplay thinking as you build your castle and create something that breathes life!
Texturing and Materials
One of the new things we cover in this course is vertex painting. We will be painting on vertices, which gives us the ability to create layered texturing. The more vertices you have, the more detailed you can make a texture. In a few words, we will be painting onto the mesh.
As part of creating our medieval castle walls, you will learn how to get your bricks to be seamless when they line up. Using this technical know-how, you will learn how to improve how realistic your medieval castle wall design looks.
This course will also teach you the basics of shaders and how to create your own water shader which you will be able to use in any other builds. But that is not the only unique feature of this course.
We will also be using a grass texture to represent the flourishing grass around our castle gate, and we will adorn the scene using solid rocks.
Lighting
Lighting is one of the most fundamental parts of this course and we take a deep dive into not only HDRI real-world lighting. For a full introduction into lighting 3D scenes, we will also cover all in-built Blender lighting functionalities.
Rendering
We render the kitbash every time we finish a section to make sure everything is going together correctly. To give you full control over the rendering process, you will learn how to render out your scene in both Eevee and cycles and you will know what their differences are.
Course Resources & Freebies
The course reference pack includes 125 texture maps, including alphas, albedo, AO, roughness, metallic, normal, height, and displacement. Our course reference schematics will also show you all the little parts of what you will be creating and they include height information for each asset.
The best course navigation tool for ‘Blender 2.9 Creating a Medieval Castle Kitbash’ will also be included. The course handbook will give the control back to you and you will be able to fully streamline your learning process to your needs and wants seamlessly.
Something like this is essential to courses as long as this one, and 3D Tudor is the first to consistently include this with all the newest courses.
‘Blender 2.9 Creating a Medieval Castle Kitbash’, is perhaps the most detailed course on Udemy. We will go through every single part of the creation process. Nothing’s left to chance.
Enrol in this course and come be part of a 3D modeling journey of over 30 hours of learning.
Check out the free introduction and I am sure you won’t be able to put this course down.
Still unsure? Then, let me tell you what’s unique about this course:
– a massive course resource pack with 125 free texture maps;
– 65 references of all kitbash items with real-world dimensions;
– animations & key commands throughout the learning process;
– full control over where you render out your scene, using Eevee or cycles;
– learning how to import and put textures together;
– becoming an expert at using the in-built Blender node wrangler add-on;
– accessing 3 courses within a course, including full lessons on (a) Blender basics, (b) materials and textures, and (c) seams, sharps, and UVs.
Who wouldn’t like to learn how to model a castle, and take their creativity to the next level by scaling it up into an entire medieval city?
Learn how to do it with just 65 pieces. Join now.
Until next time, happy modelling everyone!
Neil – 3D Tudor
-
4
 Lesson 3 - Creating The Block Wall Greybox
This lesson will focus on teaching you about edge loops in Blender 2.9. We will also be starting to build our first castle wall, thereby beginning to layout our medieval castle kitbash.
-
5
Lesson 4 - Finishing the Castle Wall Block
In this lesson, we will learn about mirror modifiers. You will also work on and complete the greybox for the first type of castle wall we will be making.
-
6
Lesson 5 - Learning how to use Array Modifier
In lesson 5, we will make a start on our second type of castle wall. This ‘Blender 2.9 Creating a Medieval Castle Kitbash’ castle wall will include slits. As you are building this, imagine the bowmen that could be firing out of those walls. Also, as part of this lesson, we will use the array modifier to ready a mesh, reading to use a boolean modifier in the next lesson.
-
7
Lesson 6 - Creating the Slit Wall Greybox
This lesson will see us finishing the modeling process for all of our castle walls. We will make use of the Blender 2.9 boolean modifier to create our castle wall slits.
-
8
Lesson 7 - Finishing the Castle Wall Grey Boxes
In this lesson, we take our first look at how we create a kitbash. In other words, I will show you how to make individual 3D parts so that they fit together. This will allow us to create castle walls of infinite height by stacking them.
-
9
Lesson 8 - Introduction to Seams & Sharps
In lesson 8, you will learn all about seams and sharps, how to UV unwrap, and how to smooth objects off within Blender 2.9. This is a short introductory video into 3D modeling basics and I include it as part of my courses to provide you with a short lesson that will prepare you for the 3D modeling process we will go over.
-
10
Lesson 9 - Introduction to Materials & Texture Maps
This lesson will focus on learning how to create materials using the node wrangler in-built Blender 2.9 addon to quickly import all texture maps. You will also learn about texture resolutions and the power of Eevee renderer.
-
11
Lesson 10 - Marking Seams & Sharps on our Castle Walls
In this lesson, we will start marking seams and sharps on our medieval castle wall extensions. We also apply the materials that we have created to these respective castle walls.
-
12
Lesson 11 - Faster Workflow for UV Mapping
In lesson 11, we will continue working on our medieval castle walls. We will mark the seams and sharps and add materials to them again.
-
13
Lesson 12 - Fixing UV's & New Ways to Unwrap Meshes
This lesson will see you learn how to fix UV errors within Blender 2.9. We will complete the process of marking seams and adding materials to all four of our medieval castle wall variations.
-
14
Lesson 13 - Learning About Collections & Bevels
In this lesson, we will learn how to line up our ‘Blender 2.9 Creating a Medieval Castle Kitbash’ castle wall bricks. This will allow the bricks to be seamless when they line up, and the process will improve how realistic the medieval castle wall design looks. We will also look at beveling edges without a modifier.
-
15
Lesson 14 - Adding New Materials to our Castle Walls
In lesson 14, we will learn about the bevel modifier within Blender 2.9. We will refine our 3D modelling skills by repeating the steps we completed over the last few lessons.
-
16
Lesson 15 - Finishing the Castle Walls
This lesson will see us completing the 3D modeling process for our medieval castle walls. This lesson’s highlight is creating the rampart stone floor asset.
-
18
Lesson 17 - Learning About Proportional Editing
In lesson 17, we make a start on our Tudor era medieval walls. You will also learn how to make good use of proportional editing within Blender 2.9 to give our wooden planks good character.
-
19
Lesson 18 - Introduction to Nodes
This lesson involves creating our Tudor era wall materials; the iconic wood, wattle and daub (i.e., wooden strips covered with clay). We will also apply them to one of our walls. The rest of the lesson will focus on using Blender’s 2.9 node system. We will learn how to use the hue and saturation node.
-
20
Lesson 19 - Tips & Tricks to Speed up Workflow
In this lesson, we will learn about transform orientation in Blender 2.9. We will also create other variations of our Tudor era walls in different sizes.
-
21
Lesson 20 - Changing Texture Mapping with Mirror
In lesson 20, we will finish our Tudor era walls. We will also take a quick look at how they look together, experimenting with the kitbash building process.
-
22
Lesson 21 - Creating our Door Openings with Boolean
This lesson will focus on creating the door openings for our Tudor era walls. This process will be completed using the boolean modifier in Blender 2.9. We will also be using proportional editing to make the walls more stylised.
-
23
Lesson 22 – Finishing the Walls & Openings
In this lesson, we will finish building the walls and openings for all of our Tudor era wall variations. We will also pack UV islands and make sure every UV looks different.
-
24
Lesson 23 - Creating our First Roof
In lesson 23, we will start building the roofs for our castle keep lower-level buildings. We will learn how to merge vertices in Blender 2.9.
-
25
Lesson 24 - Finishing the Small Roof Greybox
This lesson will see us finishing the 3d modeling of our small roof greybox. We will learn how to separate meshes within Blender 2.9 as part of this lesson.
-
26
Lesson 25 - Adding Materials to our Small Roof
In this lesson, we will continue to work on the small roof greybox we built in lesson 24. Since it is untextured, we will be working on adding materials to it in this lesson. We will use a mixture of bisect and edge loops to create the top of our small roof.
-
27
Lesson 26 - Working With the Knife Tool
In lesson 26, you will discover what you can do using the Blender 2.9 knife tool. We will use the knife tool to create a 3D illusion on our round roof tiles.
-
28
Lesson 27 - Discussing Normals & Large Roof Greybox
This lesson will be an introduction to normals in 3D modelling – their purpose, how to use them, and how to create high-quality normals. We will also be 3D modeling the large roof greybox for our Tudor era buildings. As part of this lesson, we will learn how to recalculate normal faces.
-
29
Lesson 28 - Finishing the Large Roof Greybox
In this lesson, we will complete the greybox building process for our large Tudor error building roof.
-
30
Lesson 29 - Cleaning Up Loose Geometry
Lesson 29 will cover an integral part of professional 3D modeling workflow. Nip and tuck is part of any 3D modeling process. As part of troubleshooting, we will be covering how to clean up loose geometry in 3D models. We will learn how to clean up vertices on meshes within Blender 2.9.
-
31
Lesson 30 - Finishing the Large Roof Materials
This lesson will see is finishing the materials for our large Tudor era building roof. We will work on our square roof tiles and we will make sure they line up correctly.
-
32
Lesson 31 - Setting out the Tower Template
In this lesson, we will start work on the towers of our ‘Blender 2.9 Creating a Medieval Kitbash’. As part of this lesson, we will be setting out a tower template. This will allow us to use it for the remaining variations we will 3D model later.
-
33
Lesson 32 - Creating the Tower Top Block Greybox
-
34
Lesson 33 - Finishing the Tower Top Block
This lesson will allow us to complete the building process for our tower top block medieval castle asset. We will learn how to line up our UVs for complex faces.
-
35
Lesson 34 - Finishing the Square Tower Tops
In this lesson, we will finish modeling the square tower tops.
-
36
Lesson 35 - Creating the Wooden Surround
In lesson 35, we will begin modeling another tower asset. Our focus will be on creating the wooden surround greybox. As part of this lesson, we will make sure that our wooden supports are structured in such a way to be able to hold the weight that they intended to support and to add realism to our overall medieval castle keep scene.
-
37
Lesson 36 - Wooden Surround Materials & Bolts
This lesson will utilise the wooden surround greybox we created in the last lesson. We will be applying materials to it, and we will add bolts to its design to make it more realistic. You will learn how to create just the right amount of metallic and roughness finish for your bolts.
-
38
Lesson 37 - Finishing the Wooden Surround
In this lesson, we will finalise all work on the wooden surround tower asset for our ‘Blender 2.9 Creating a Medieval Castle Kitbash’ scene.
-
39
Udemy - Blender 2.9 - Lesson 38 - Creating the Stone Surround Greybox
In lesson 38, similar to how we created the wooden surround greybox, we will be proceeding with making a stone variation of this asset. We will 3D model a greybox of it. We will work on our stone tower using a mixture of extrusion and solidify modifiers within Blender 2.9.
-
40
Udemy - Blender 2.9 - Lesson 39 - Learning When to Restart a Mesh
This lesson will be another tutorial into troubleshooting in 3D modeling. We will cover how to know when to restart a mesh.
-
41
Lesson 40 - Finishing our Square Surrounds
In this lesson, we will finalise the square surrounds for our medieval castle tower buildings. This lesson will cover both the wooden and stone variations of these. We will create the stone tops ornamentation, and we will also test the stone top out against our tower to make sure it fits right.
-
42
Lesson 41 - Laying Out our Large Tower Idea
Lesson 41 will see us laying out our large tower idea. This tower will include a set of steps leading down to it. We will start planning out the steps using our human reference to make them realistic.
-
43
Lesson 42 - Different Ways to Solve Problems
This lesson will allow us to revisit the 3D modeling workflow and troubleshooting. We will focus on solving different problems. Our building focus will be working on the stone surrounds for the steps, as well as the steps themselves.
-
44
Lesson 43 - Adding Materials to the Large Tower
In this lesson, we will be using the untextured large tower model that we created in the last lesson. We will add materials to it. You will learn how to create meshes that give the illusion of being more than they are (i.e., we are creating a walkway but you cannot see around the corner of it).
-
45
Lesson 44 - Finishing our Large Tower
In lesson 44, we will finalise our large tower asset for our medieval castle scene. You will be able to try out our newly-created tower and we will make a start on our trap door.
-
46
Lesson 45 - Learning About the Mesh Extras Addon
This lesson will help you expand your 3D modeling skills further. As part of this lesson, you will be learning all about the mesh extras Blender 2.9 addon. You will find out how to create hinges the easy way. Finally, you will also learn about the pipe Blender 2.9 addon.
-
47
Lesson 46 - Different Shading Options
In this lesson, we will finish working on our wooden trap door. This will also allow us to go over different shading options. You will learn an excellent way to create handles within Blender 2.9.
-
48
Lesson 47 - Creating our Wooden Window Greybox
In lesson 47, we will be creating the greybox for our wooden window. As with all buildings, windows are essential, but for ‘Blender 2.9 Creating a Medieval Kitbash’, this window will be only one of the options that you can use to diversify your medieval castle models.
-
49
Lesson 48 - Laying out the Stone Window
This lesson will be similar to the previous one in that we will be laying out the design of a window. This time, the design will resemble a half-prism and the window will be made of stone. We will give the windows the illusion of depth because we cannot use glass as it would take away from the realism of our ‘Blender 2.9 Creating a Medieval Kitbash’ scene.
-
50
Lesson 49 - Creating Notched Bars with Array
In this lesson, we will be creating notched bars for our medieval stone windows. You will learn how to do this using the array modifier in Blender 2.9. We will also create the knobs for the windows.
-
51
Lesson 50 - Testing out our Windows
In lesson 50, we will be testing how well our medieval windows integrate into the 3D assets that we have built so far.
-
52
Lesson 51 - Creating our Second Walls
This lesson will be the first part of working on our second type of walls for our ‘Blender 2.9 Creating a Medieval Castle Kitbash’ lower quarter. These walls will be wooden and they will be made up of planks laid parallel to one another. We will be focusing on the 3D modeling process here.
-
53
Lesson 52 - Setting Up our Plank Material
In this lesson, we will be setting up the plank material for our ‘Blender 2.9 Creating a Medieval Castle Kitbash’ wooden lower quarter walls. We will take special care to make sure that the housing looks more suitable for lower-economy citizens as part of the storytelling element of the course.
-
54
Lesson 53 - Creating Plank Wall Doors
In lesson 53, we will be creating the doors for our wooden plank walls. We will learn how to automatically pack all of our textures into one Blender file.
-
55
Lesson 54 - Creating our Plank Wall Roof Greybox
This lesson will focus on a counterpart of the wooden plank walls we just created. Like every house, we will also need a roof. We will be focusing on creating the wooden plank wall roofs as a greybox. Finally, we will start working on the most difficult parts of the build – the hay roof.
-
56
Lesson 55 - Finishing The Wood Part of the Roof
In this lesson, we will work on the wooden part of our roof. These planks of wood will be located under the hay. We will also be testing how our wooden plank buildings are working together.
-
57
Lesson 56 - Working with Alphas
Lesson 56 will see us working with alphas to create the hay that will lie on top of our wooden plank wall roofs. As part of this, we will learn about sub-division modifier, and we finally bring in our hay alphas. We will create 6 hay pieces and use displacement to bring all the little hay pieces out and make them look 3D.
-
58
Lesson 57 - Finishing the Hay Roof
This lesson will allow us to finalise working on our hay roofs. You will also learn how to make sure that the lighting is as it should be for the hay.
-
59
Lesson 58 - Creating our First Tower Roof Greybox
In this lesson, we will be 3D modeling the greybox of our first tower roof. Its design will be consistent with our other Tudor era walls and roofs, featuring the same white walls and black wooden plank details.
-
60
Lesson 59 - Testing Out our Roofs as a Kitbash
Lesson 59 will see us testing out whether the alcove roof assets we created work the way they were intended to for our kitbash.
-
61
Lesson 60 - Working With Templates
This lesson focuses on creating one large roof and using it as a template to create two other variations of it that are smaller. You will be able to apply this process to your future projects for models that could be alternated in similar ways. You will also learn how roof mid-sections can go together without overlapping.
-
62
Lesson 61 - Working on our Small Tower Roofs
In this lesson, we will be working on our small tower roofs. These are the roofs that we created in the previous lesson using our large roof template. We will also add character to our roofs using the Blender 2.9 proportional editing tool.
-
63
Lesson 62 - Finishing our First Tower Doors
Lesson 62 will complete the building and texturing process for our first tower roofs reminiscent of the Tudor era architectural design. We will also take a first look at the castle doors and look at how we are going to create them using our references.
-
64
Lesson 63 - Starting our Three Doors
This lesson will be the start of our door creation process for our ‘Blender 2.9 Creating a Medieval Castle Kitbash’ scene. We will make a start with all three-door variations. Using the Blender 2.9 pipe addon, we will create door handles.
-
65
Lesson 64 - Creating & Finishing the Wood Doors
In this lesson, we will complete the modeling and texturing process for our three wooden doors. We will look at how we can manipulate the roughness values in our models.
-
66
Lesson 65 - Creating our Stone Doorway
Lesson 65 is focused on creating our stone doorway for the three wooden door variations we created in the previous lesson.
-
67
Lesson 66 - Testing Out Our Doors
This lesson will allow us to test whether our wooden doors with stone doorways function the way they intended to when we integrate them into other assets of our ‘Blender 2.9 Creating a Medieval Castle Kitbash’ scene.
-
68
Lesson 67 - Creating the Castle Wall Steps Greybox
In this lesson, we will 3D model the greybox for our stone castle wall steps in Blender 2.9. We will model them in such a way that two sets of steps can be placed next to each other at different levels so that they look like they follow on from one another.
-
69
Lesson 68 - Finalizing our Castle Wall Steps
Lesson 68 will see us completing the castle wall steps and texturing them with stone bricks. We will pay special attention to make sure that the stones are put on the steps evenly.
-
70
Lesson 69 - Creating the Rounder Tower Greybox
This lesson will focus on 3D modeling our round tower greybox. Like the square castle tower asset we created, this tower will also feature stairs, but this time they will be spiral stairs. We will also look at how to get the most out of cylinders based on vertices.
-
71
Lesson 70 - Finishing the Round Tower Staircase
In this lesson, we will focus on 3D modeling the spiral staircase of our round tower asset. You will learn how to use empties and array modifier to create the spiral.
-
72
Lesson 71 - Creating the Stone Wall Top
Lesson 71 will involve creating the stone wall on top of our round tower assets. This is the area of the tower that protrudes out of its basic design and allows people to ascend onto the top of the tower. We will finish off our spiral staircase with stone blocks on top.
-
73
Lesson 72 - Adding Materials to the Round Tower
This lesson will be all about adding materials to the round tower asset we created for our ‘Blender 2.9 Creating a Medieval Castle Kitbash’ scene. As part of this lesson, we will start to mark sharps and seams, and start adding textures.
-
74
Lesson 73 - Finshing the Round Towers
In this lesson, we will complete the remaining tasks that will allow us to finalise the design of our round tower assets. This will also include work on the extension tower.
-
75
Lesson 74 - Creating our Round Top Block Part
Lesson 74 will see us creating the top part or, otherwise called, the crown of our round tower asset. This will provide fortification to the tower and is integral to medieval architecture. The design of this castle crown is what I would call a classic castle design.
-
76
Lesson 75 - Creating our Round Top Stone Part
This lesson will be similar to the previous one, but this time, we will be creating a variation of the previous tower crown. This one will feature different decorative details. We will focus on making sure that the top stone part is realistic and built as though it is supportive of the weight it will need to hold.
-
77
Lesson 76 - Creating the Wooden Round Top Greybox
In this lesson, we will create another tower crown. This time, it will be wooden. We will be using the skills we have learned before, and the Blender 2.9 creation process should be streamlined.
-
78
Lesson 77 - Creative Ways to UV Unwrap
Lesson 77 will let us use the wooden crown we created as part of the previous lesson to learn about creative ways to UV unwrap.
-
79
Lesson 78 - Starting our Tower Top Extention
This lesson will be the first of two lessons during which we will be creating a tower top extension. This extension will take our tower assets to new heights and add a lot of character to their design if you choose to use it. We will use our cursor to place our wooden supports.
-
80
Lesson 79 - FInishing our Tower Tops
In this lesson, we will finish working on our tower tops. We will also be making sure a lot of the parts are named.